Mosquitto + TLS on AWS EC2
Step-by-step guide to deploy a secure MQTT broker with TLS encryption on an AWS EC2 instance using Docker: instance setup, certificates, running and verifying.
facumruiz/mosquitto-tlsHow to deploy an MQTT broker (Mosquitto) with TLS enabled on an AWS EC2 instance, using Docker and a repo with the configuration and certificates. Meant to quickly set up a secure broker for IoT or device-to-device messaging.
The process splits into two parts: (1) creating and configuring an EC2 instance on AWS, and (2) installing Docker, cloning the repo, and running the broker with TLS. Two more sections cover verifying the TLS connection and common troubleshooting.
Prerequisites
An AWS account with permissions to create EC2 instances · basic command-line and SSH knowledge · Git and an SSH client on your local machine · access to the configuration repo (facumruiz/mosquitto-tls).
Part 1 · EC2 instance on AWS
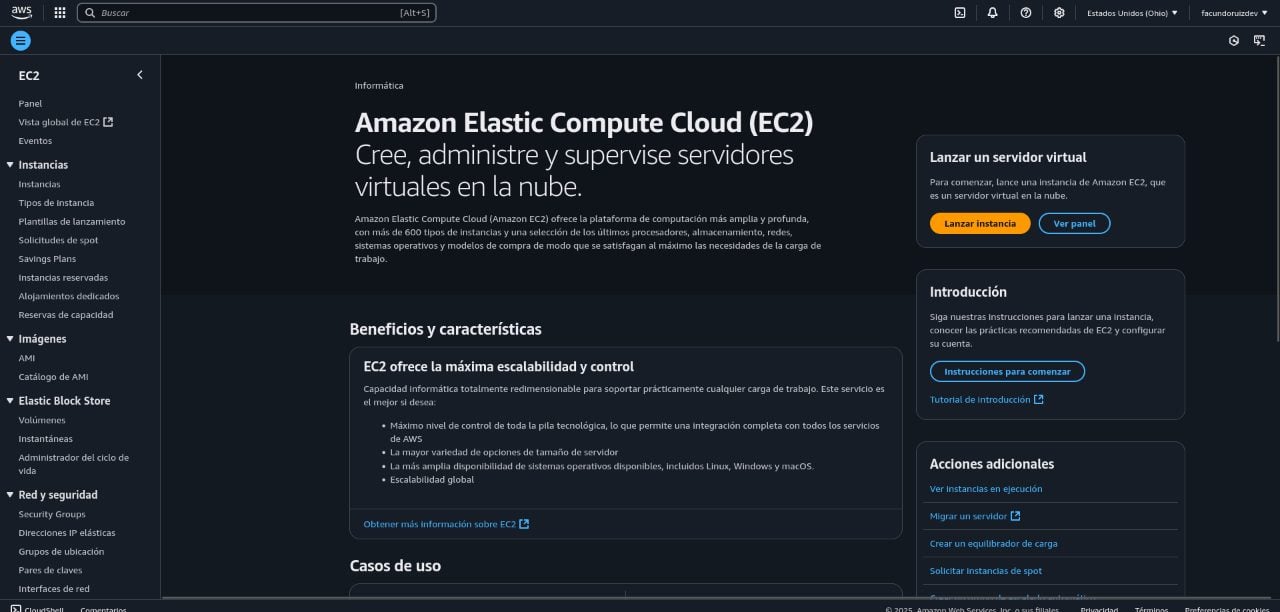
Step 1 — Sign in and open EC2
Log into the AWS console and go to the EC2 service from the top search bar or the services panel.
Step 2 — Create a new instance
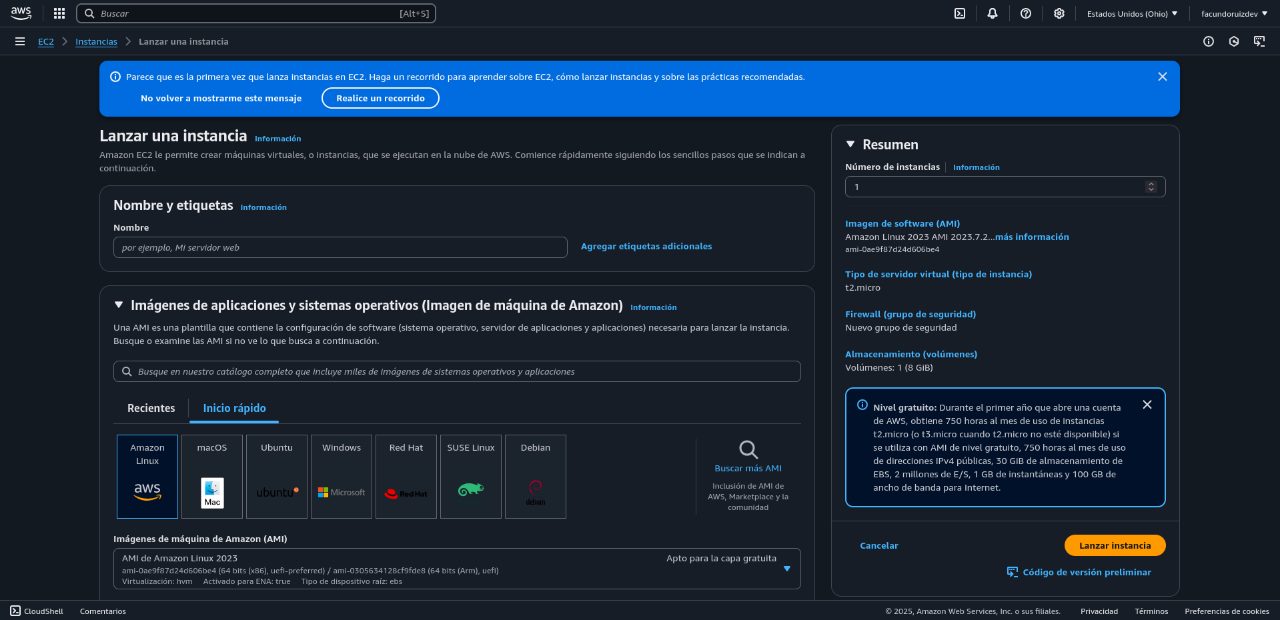
From the EC2 Dashboard, go to «Instances» → «Launch instance». Give it a descriptive name (e.g. mosquitto-tls), pick a Linux-based AMI (Ubuntu or Debian), and leave the type as t2.micro / t3.micro to stay within the free tier.
Step 3 — Network and security
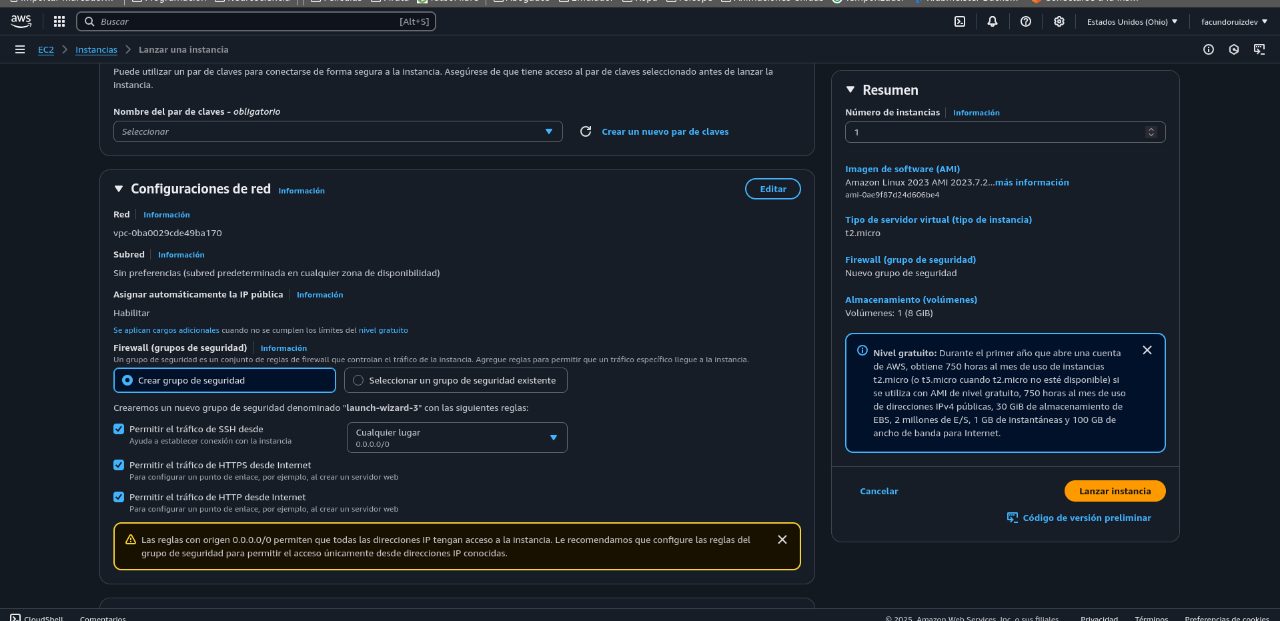
In Network settings, the wizard offers checkboxes for SSH (22), HTTP and HTTPS (443, optional). Port 8883 (MQTT over TLS) doesn't show up as a checkbox: add it manually as a custom rule — Type: Custom TCP · Port: 8883 · Source: 0.0.0.0/0 (better yet, your known IP range).
Step 4 — Key pair (.pem)
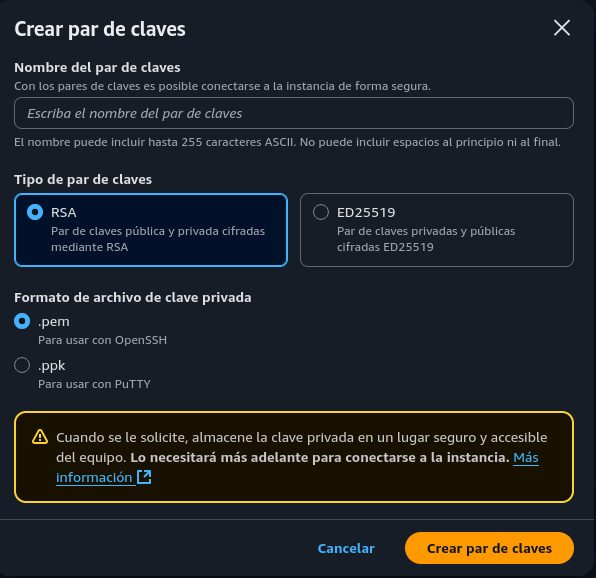
In the key pair section, choose «Create new key pair», type RSA, and format .pem (OpenSSH/Linux/macOS) or .ppk (PuTTY on Windows). Store the .pem somewhere safe: it's needed for SSH and can't be downloaded again.

Step 5 — Instance public IP
You'll need it for SSH and for the TLS certificate (Part 2, Step 3). In EC2 → Instances, open your instance and copy the «Public IPv4 address» field on the Details tab.
Step 6 — Connect via SSH
chmod 400 your_key.pem
ssh -i your_key.pem <user>@<instance-public-ip>
Replace <user> based on the AMI: ubuntu (Ubuntu), admin (Debian), or ec2-user (Amazon Linux), and <instance-public-ip> with the IP from Step 5.
Part 2 · Docker, Git and the broker
Step 1 — Install Docker and Git
# Update the system
sudo apt update

# Install Docker and its tools
sudo apt install docker-ce docker-ce-cli containerd.io \
  docker-buildx-plugin docker-compose-plugin -y

# Install git
sudo apt install git -y
Step 2 — Clone the repository
git clone https://github.com/facumruiz/mosquitto-tls.git
cd mosquitto-tls
git checkout version/aws
The version/aws branch ships EC2-ready config: docker-compose.yml (defines and exposes the broker on 8883), Dockerfile (image based on eclipse-mosquitto:2.0), config/mosquitto.conf (TLS listener on 8883), generate-certs.sh (generates the CA and certificate), and the certs/ folder (created by the script).
Step 3 — Generate the TLS certificates
nano generate-certs.sh

# Replace 3.132.251.70 with your public IP in:
#   -subj ".../CN=3.132.251.70"       (server CSR)
# subjectAltName = IP:3.132.251.70 (SAN extension)chmod +x generate-certs.sh
./generate-certs.shThe script creates certs/ with the certificate authority (ca.key, ca.crt) and the server certificate (server.key, server.crt) signed with the configured CN/SAN.
Step 4 — Start the container
sudo docker compose up -dThe first run builds the image from the Dockerfile (copying config and certs) and starts the mosquitto_tls container in the background.
Step 5 — Verify it's running
sudo docker ps

CONTAINER ID   IMAGE           PORTS                    NAMES
abc12345       mosquitto_tls   0.0.0.0:8883->8883/tcp   mosquitto_tls
Step 6 — Check the logs
docker compose logs mosquitto

mosquitto-1  | mosquitto version 2.0.21 starting
mosquitto-1  | Config loaded from /mosquitto/config/mosquitto.conf.
mosquitto-1  | Opening ipv4 listen socket on port 8883.
mosquitto-1  | mosquitto version 2.0.21 running
Part 3 · How the repository works
Optional: not required to run the broker, but it helps to understand each file and edit it with confidence.
docker-compose.yml
version: '3.7'

services:
  mosquitto:
    build: .
    container_name: mosquitto_tls
    ports:
      - "8883:8883"
    volumes:
      - ./config/mosquitto.conf:/mosquitto/config/mosquitto.conf
      - ./certs:/mosquitto/certs
    restart: unless-stopped
build: . builds the image from the local Dockerfile. container_name gives it a fixed name (mosquitto_tls). ports maps host 8883 to container 8883. volumes mounts the config and certs inside, so editing either only needs a container restart. restart: unless-stopped brings it back up if it crashes or if you restart the EC2 instance.
Dockerfile
FROM eclipse-mosquitto:2.0

COPY config/mosquitto.conf /mosquitto/config/mosquitto.conf
COPY certs /mosquitto/certs
Starts from the official image that already ships the broker, and copies the config and certs to the paths Mosquitto expects. Since the compose file also mounts them as volumes, the instance's files win at runtime; the COPY keeps the image self-contained even if you ever run it without volumes.
generate-certs.sh
Creates its own CA and a server certificate signed by it. Analogy: the CA issues an «ID document» (ca.crt) that clients trust; server.crt is the broker's «ID card», signed by that CA. Walking through it block by block:
1 · Defines the file names inside certs/ and creates the folder.
CERT_DIR="./certs"
CA_KEY="$CERT_DIR/ca.key"
CA_CRT="$CERT_DIR/ca.crt"
SERVER_KEY="$CERT_DIR/server.key"
SERVER_CSR="$CERT_DIR/server.csr"
SERVER_CRT="$CERT_DIR/server.crt"
EXTFILE="$CERT_DIR/server_ext.cnf"

mkdir -p "$CERT_DIR"
2 · Creates the CA: an RSA 2048 key (the «master key») and, with it, a self-signed certificate valid for 365 days. ca.crt is the file that gets copied to every client.
openssl genrsa -out "$CA_KEY" 2048

openssl req -x509 -new -nodes -key "$CA_KEY" -sha256 -days 365 \
  -subj "/C=AR/ST=BuenosAires/L=CABA/O=FacundoRP/CN=MQTT_CA" \
  -out "$CA_CRT"
3 · Generates the server's private key (never leaves the instance) and a CSR: a certificate request with CN = the IP clients will validate. That CN is the value to swap for your IP (Part 2, Step 3).
openssl genrsa -out "$SERVER_KEY" 2048

openssl req -new -key "$SERVER_KEY" \
  -subj "/C=AR/ST=BuenosAires/L=CABA/O=FacundoRP/CN=3.132.251.70" \
  -out "$SERVER_CSR"
4 · Adds the SAN (subjectAltName). Modern clients — including mosquitto_sub — validate the SAN in addition to the CN; without it, the certificate would be rejected.
cat > "$EXTFILE" <<EOF
subjectAltName = IP:3.132.251.70
EOF
5 · The CA signs the server's CSR, including the SAN. The result, server.crt, is the final certificate Mosquitto presents to every client.
openssl x509 -req -in "$SERVER_CSR" -CA "$CA_CRT" -CAkey "$CA_KEY" \
  -CAcreateserial -out "$SERVER_CRT" -days 365 -sha256 \
  -extfile "$EXTFILE"
6 · Deletes the temporary CSR and extension file: they're already «baked into» server.crt.
rm -f "$SERVER_CSR" "$EXTFILE"Part 4 · Verify the TLS connection
Option A — from the instance itself
# Install the client
sudo apt install mosquitto-clients -y

# Subscribe to a topic
mosquitto_sub -h localhost -p 8883 \
  --cafile ./certs/ca.crt -t "test/topic" -d

# Publish (in another terminal)
mosquitto_pub -h localhost -p 8883 \
  --cafile ./certs/ca.crt -t "test/topic" -m "Hello TLS!"
Run both from inside the repo folder (where certs/ lives). If the message shows up in the mosquitto_sub terminal, the broker is working over TLS.
Option B — from your computer
scp -i your_key.pem admin@<instance-public-ip>:~/mosquitto-tls/certs/ca.crt .

mosquitto_sub -h <instance-public-ip> -p 8883 \
  --cafile ca.crt -t "test/topic" -d
Only works if the certificate was generated with the CN/SAN matching that public IP (Part 2, Step 3) and if 8883 is open in the security group (Part 1, Step 3).
Security best practices
Restrict SSH (22) and, if possible, 8883 to known IPs · keep the OS and Docker updated (sudo apt update && sudo apt upgrade) · add username/password or client-certificate auth on top of TLS · rotate certificates before they expire · never keep the .pem in repos or shared folders.
Troubleshooting
Can't connect via SSH
The .pem must have 400 permissions (chmod 400 your_key.pem) · the security group must allow port 22 from your IP · use the right user for the AMI (ubuntu, admin, ec2-user).
Can't connect to the broker (8883)
Confirm the TCP 8883 firewall rule (Part 1, Step 3) · check docker compose logs mosquitto for startup errors · verify the container is running with docker ps.
Certificate error (hostname mismatch)
The most common error: the CN/SAN doesn't match the IP you're connecting to because generate-certs.sh wasn't edited (Part 2, Step 3). Regenerate the certificates with the correct IP and restart: docker compose up -d --build. As a last resort for testing only, mosquitto_sub/pub has --insecure — never use it in production.